- Leveridge Gauge
- Digital gauge
- Ika Caliper
- Caliper "FT 30"
- Screw-Micrometer
- Proportion Analyzer
- Proportion Scope and its use
- Leveridge Gauge
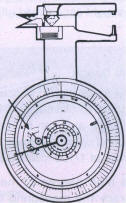
For measuring the height and girdle diameter of cut diamonds the Leveridge Gauge (Fig 372) has proved itself in practice. It has a millimeter scale, on which tenths of a millimeter can be accurately read, and hundredths fairly accurately estimated. The scale goes up to about 23.5 millimeters. Mounted as well as loose stones can be measured.
| Measurement of the girdle diameter: 12.05 mm | Measurement of the total height: 7.07 mm |
 |
|
| With a screw-on pin, stones in very deep settings can also be measured | |

|

|
| Fig 372 Measuring functions of the Leveridge gauge | |
|

|
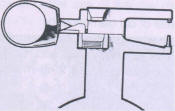
| Fig 373 The pointed ends of a Leveridge gauge facilitate the measuring of set stones. | |
Extensive charts of weight are provided with the instrument, from these the carat weight can be read off from the values measured.
- Digital Gauge
The digital display helps to prevent measuring errors and makes for relaxed work even over long periods. It has an accuracy of 1/100 millimeter (Fig 374).Thanks to the electronic gauge (made by Presidium Instruments) it is no longer necessary to estimate the hundredth millimeter during the measurement of gemstones, as it can be read off exactly.
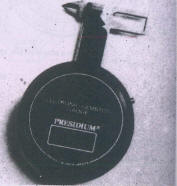 For
a high degree of measuring accuracy the measuring tips and platform are
made from a very hard steel.
Set gemstones can be measured with a measuring attachment specially developed for deep settings. The electronic zero stone device makes calculations and laborious adjustments unnecessary, as the electronic dial gauge takes over these operations.
The instrument can be easily carried in its handy case. Attached to it is the Presidium Diameter, a practical slide rule for determining the approximate carat weight of round diamonds in brilliant cut.
The automatic magnetic switching-off mechanism switches the instrument off when it is placed in the case, thus saving the battery.
- Ika Caliper
The Ika Caliper is a precision measuring-tool, which permits an exact reading to e hundredth of a millimeter and an estimating capacity to one thousandth. The caliper has a span of measurement up to 20 mm. It is very handy but not suited to measuring mounted stones.
- Caliper "FT 30"
This precision measuring instrument Caliper "FT 30" of the firm Schneider is suitable for diamonds as well as colored stones. The measuring distance is 30 mm, tolerance 0.01 mm. The instrument is made of hard metal to ensure durability (Fig 375).

|
| Fig 375 Caliper FT 30 (Schneider) |
- Screw Micrometer
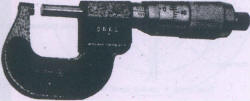 The
Screw-Micrometer is suited to very exact measurements. With it, too exact
results to one hundredth of a millimeter can be obtained. However, it is
not usable for mounted stones. The measuring span extends up to 25.5
millimeters
(Fig 376).
- Proportion Analyzer
For quick measurement of the proportions of the brilliant cut and for determining its percentage ratios, the Proportion Analyzer was first of all developed by the gemological Institute of America, to be used as an accessory to the Gemolite microscope. The Proportion Analyzer is used instead of the usual ocular; observation is purely monocular.
In using the Proportion Analyzer the brilliant to be examined is held between its table and culet in a special stone-holder (Fig 378), which is attached to the metal ring over the light opening of the Gemolite by means of four magnetic screws and is easily movable in all directions. In the light-field position the light penetrating from below casts a shadow image of the stone to be checked on to the matt slide in the Proportional Analyzer. By means of zoom magnification and the focusing mechanism of the microscope a brilliant is projected with sufficient enlargement for its girdle line to coincide with the girdle of the brilliant, drawn in the analyzer.
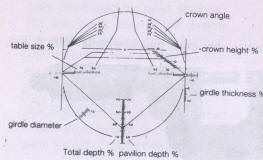
In comparison with the drawn brilliant, which is provided with various scales of values, the percentage value of a stone for its table diameter, girdle thickness, crown and pavilion depth, total height, as well as the symmetry of the brilliant can be read off and any existing deviations easily determined.
 |
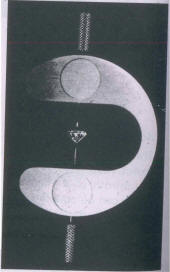 |
| Fig 377 Representation of a brilliant with details of proportions | Fig 378 Stone holder for measuring proportion |
Proportion Scope and its use
Improved illumination and an enlarged image screen are combined in the PROPORTION SCOPE of the GIA. It is an independent apparatus, no longer used in conjunction with the Gemolite (Fig, 379).
The compact metal housing carries on its slighted tilted front a circular image screen. mounted in a metal frame. and easily adjusted by means of four magnetic screws. The different slides permit cut testing of brilliants between 0.20 and 8.0 ct.
The principle of the proportion scope is similarly based on comparison of the sideways shadow-image cast by the stone to be checked on to the image screen, with that of the brilliant cut outlined on the screen.
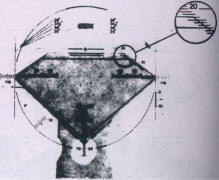
The drawing of the brilliant cut on the screen corresponds to the proportions of the TOLKOWSKY Brilliant. It is provided with horizontal. vertical and diagonal scales, from which the values of table diameter. crown and pavilion heights. total height and girdle thickness can be read off directly in percentages of the girdle diameter, as well as the crown angle (Fig 380).
 |
 |
| Fig 379 GIA-Proportion Scope | Fig 380 Screen of the GIA-Proportion Scope |
The objection that the Proportion Scope fails in its purpose and is unsuited for use in Germany because the Tolkowsky cut and not the Practical Fine Cut is shown on the screen, can be countered in two ways: Firstly, the two types of cut agree, within very narrow tolerances; secondly, the shadow image of the stone should not be compared with the diagram but a direct reading of the percentage values of all the proportions which are required for cut-grading should be made.
First of all the brilliant is clasped in a special stone-holder and held by its table and culet. A peg at one end of the holder lies against the table, and in the other recessed end the stone point is slightly sunk; nevertheless it remains visible through four side-openings. The metal stone-holder is fastened by means of two magnetic screws over the light opening of the Proportion Scope and is, like the picture-screen, easily adjustable. .
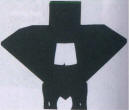
A screw in the extension of the holder turns the stone round on its vertical axis (table-culet). Now, by rotating it, the stone should be so positioned that the diagonal line joining the table edge to the girdle of the stone follows a straight course (Fig 381 a). This requirement is fulfilled by sighting along the upper main facets.
The lines are bent in the directions of the table and girdle-facets (Fig 381 b). It is not always possible to get a straight connecting line on both sides, because even small irregularities in symmetry ratios give a straight line on one side and an angled line on the other, for similar facets are not then directly opposite one another (Fig 381 c).
 |
 |
 |
 |
 |
 |
| Correct adjustment | Incorrect adjustment | Unsymmetrical brilliant |
By turning the milled ring at the front of the right-hand side, the silhouette of the brilliant can be reduced or enlarged until the girdle of the shadow image coincides with the horizontal girdle line of the diagram. The outline on the screen is focused by turning a knob in the centre of the instrument above the light-opening. By adjusting the enlargement screw and sharpening the focus the shadow image shifts into the correct position: the edges are sharply outlined and the girdle diameter coincides with that of the diagram.
First the table is measured. The silhouette of the brilliant is lowered by adjusting the matt screen, which is secured by magnets, until the table corners touch the horizontal scale of the diagram. Each subdivision of this scale corresponds to 2 % of the girdle diameter (Fig 382). It is particularly important in measuring the table, that the crown facets form a straight line, otherwise the measurement is that of the edges and not of the table corners; this would result in an incorrect percentage value.
In the same position the thickness of the girdle can be read off simultaneously - likewise in four directions - on the side-scale from 0-10 %, lying outside the circle. The girdle is measured in this manner at its widest extension, the intersection of the facets (Fig 383).

|

|
| Fig 382 Measuring size of the table | Fig 383 Measuring thickness of the girdle |
For measuring the pavilion depth, the matt plate is adjusted so that the lower edge of the girdle in the silhouette coincides with the lower line of the girdle in the diagram.
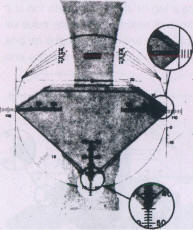
The pavilion depth can be read off, as a percentage of the girdle diameter, on the right-hand side of the vertical scale which runs through the point of the stone (Fig 384). Any lateral displacement of the culet will be registered at the same time by this measurement; the length of a small subdivision corresponds to an eccentricity of 3 %, that of a larger subdivision to 5 %. The crown height is visible on the right-hand diagonal scale 5-20 % (Fig 385). By adjusting the screen, the upper girdle edge of the stone is brought into line with the boundary of the crown. Since the crown height in brilliants occasionally varies slightly, unequivocal results can be obtained only by making several measurements while turning the stone. For the measurement of the total height which, in fact, only serves as an additional check - the table edge of the shadow image is moved to the horizontal line marked 0 (Fig 386). The total height is calculated from the sum of the crown height, girdle thickness, and pavilion depth, all already measured. The percentage values for the total height are visible on the left-hand side of the vertical scale which runs through the point of the stone.
|
|
| Fig 384 Measuring the pavilion depth | Fig 385 Measuring the crown height |
The angle of the crown main facets can be read off in the region of 25°-38°. The angle measurement starts from the upper edge of the girdle. which must be adjusted exactly to the marking intended for it. As the measurement of the crown angle is always related only to the main facets, care must be taken to ensure that the connecting line from the upper girdle-edge to the table-corner is straight, so that it is a main facet which is projected.

|

|
| Fig 386 Measuring total height | Fig 387 Measuring deviation from the circular shape. Determination of loss of weight in cases of damage and old cuts. |
A last observation is made on the regularity of the girdle diameter. The brilliant is laid with table downwards on a stage above the light opening. Any narrowing of the circumference present can be read off on the short diagonal scale (Fig 387). In brilliants whose girdles have been damaged, e.g. with nicks or fractures, the weight loss which such a stone would suffer in re-cutting can be obtained by a similar method. Each subdivision of the scale represents one-hundredth of a carat.
| New Diamond Cuts | Weight |