- The technique of louping
- The technique of microscopy
- Differentiating between surface features and inclusions
- Reflected inclusions
- Representation of internal and external features in the identity diagram
- Symbols of representation of inclusions
- Microphotography
The technique of louping
One needs a certain experience to be able to use a loupe, which can only be acquired with practice. To loupe for a longer period of time is very tiring, and specially the learner should only use a loupe for short periods. A relaxed body posture is essential.
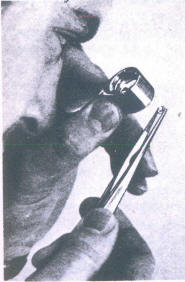
The loupe is held in one hand between thumb and index finger and as close as possible to the "Loupe eye". It is up to the individual whether he prefers to use the left or right eye for louping. It is important that the eye which does not use the loupe is open, for if it is clenched close, the eye tires rapidly and louping becomes a strain. The other hand holds the tongs, also between thumb and index finger. The handle of the tongs lies in palm of the hand. The tongs also should be held without tension or pressure, just firm enough, so that the diamond does not drop (Fig 162).
The conventional tongs are made of stainless steel and are sixteen to eighteen cm long. The smaller the stones, the lighter and smaller should be the tongs. Black tongs are more suitable than chrome-colored ones as they produce fewer reflections. For beginners well-adjustable tongs are specially suitable (Fig 163).
 Fig, 162 Louping |
 Fig, 163 Various tongs. the lowest is adjustable |
They are of help when sketching an identity diagram, make it easier for the grader to hold the stone in the same position when marking the Inclusions. Only experience and a certain routine will develop the dexterity to skillfully handle ordinary, not-adjustable tongs and to be able to rotate and move the stone in all directions.
he tongs with the diamond is led .near to the louping eye. The distance between loupe and stone is varied till one finds a position in which the Image appears sharp.
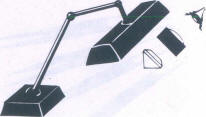
A comfortable contact between both hands should be arranged to have a steady hand which will be able to keep a uniform distance between the loupe and stone and thus produce a constant loupe image. Depending on the height of the working table, the elbows should either be placed on the table surface or held loosely against the table edge. Light is most important during louping. A suitable illumination can be provided by the day-light lamp used in color grading. Ideal light conditions are set, if the light does not fall directly perpendicularly from above onto the stone, but onto the pavilion facets, illuminating the stone from inside. This also reduces the surface luster which is considerable under direct lighting. Therefore the stone is held directly in front of the lamp case (Fig 164).
In this way one creates the conditions of a dark field illumination.
The back-
ground for this work should be "quiet" and neutral as far as color is
concerned, so that the eye is not distracted by colored or
contrast-rich objects. One best uses as background a white sorting block
from which layers of paper can be removed (when used or dirty) which
shows up the smallest inclusions and makes them more easily visible.

Fig 164 The most advantageous position of the
brilliant toward the light source.
| Potteratmaster | The technique of microscopy |